Flashcards are a timeless and effective tool for learning. They can help you memorize facts, definitions, and concepts in a fun, interactive way. And guess what? You don’t need to buy fancy cards from a store or spend hours doing them with paper and scissors. You can easily make them using tools like Google Docs and Microsoft Word. Let’s dive into how to make flashcards on Google Docs and Word, explore some templates, and share key tips.
How to make flashcards on Google Docs
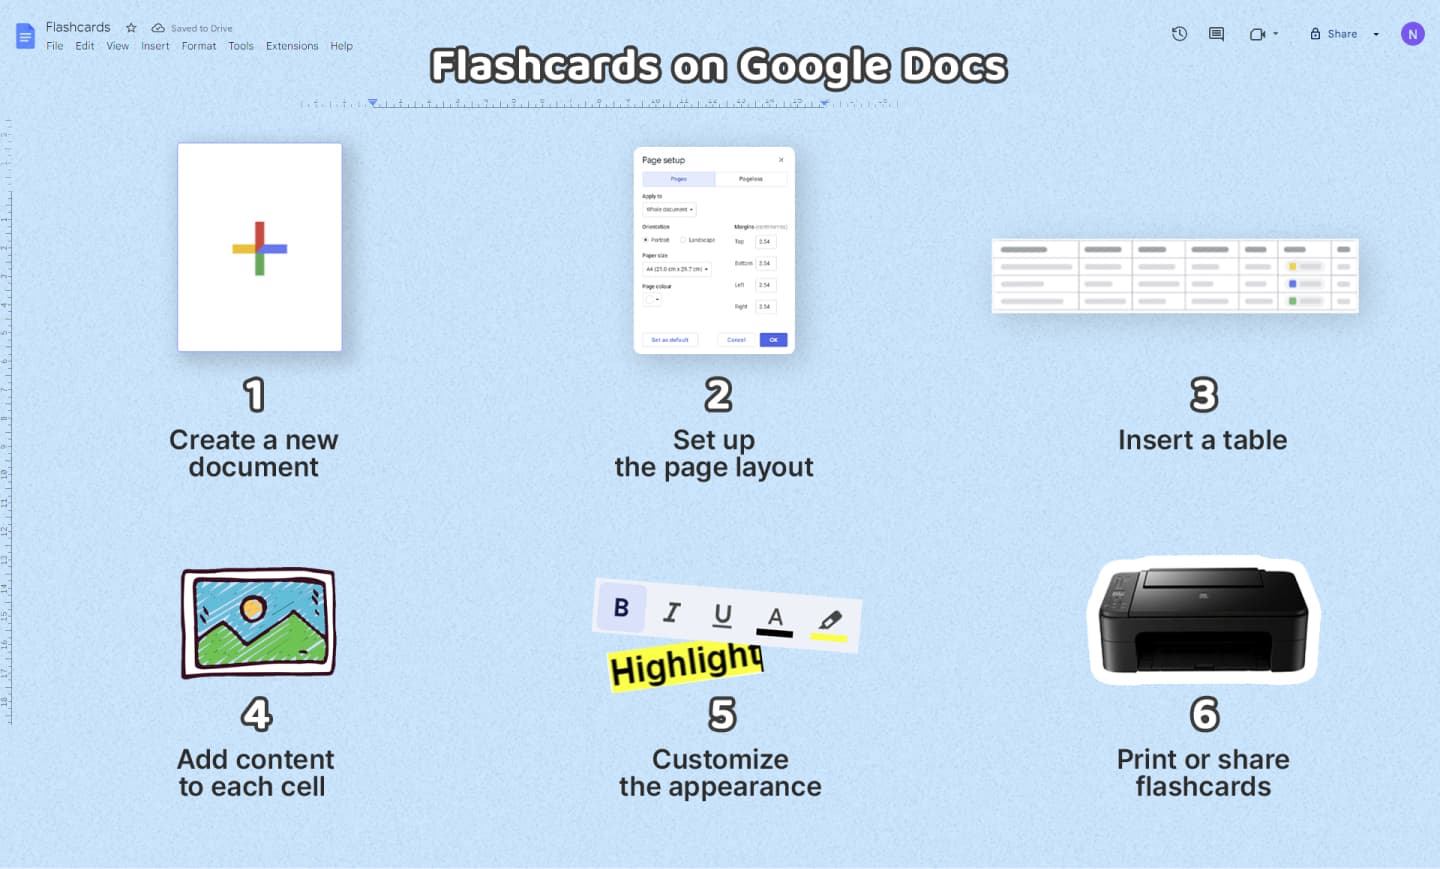
Here are the step-by-step instructions on how to create printable flashcards in a Google Doc:

Step 1: Create a new document
- Fire up your browser and head to Google Docs.
- Click on the plus sign (+) to create a new blank document.
Step 2: Set up the page layout
- Go to the menu: File > Page setup.
- Choose the size of your flashcards (A4, Letter, or any custom size).
- Decide on the orientation – the landscape is often best for flashcards.
Step 3: Insert a table
- Click on Insert > Table.
- Select the number of rows and columns (2×1 for two cards, 4×1 for four, etc.).
Step 4: Add content to each cell
- In the first cell, type your question or term.
- In the cell next to it, type the answer or definition.
- Repeat for each row.
Step 5: Customize the appearance
- Highlight your text to change the font size and color.
- Use the Borders tool to add or remove cell borders to distinguish each card.
Step 6: Print or share the flashcards
- Go to File > Print to print your flashcards.
- Alternatively, share them digitally by clicking “Share” and entering email addresses or copying the link.

How to find flashcard templates for Google Docs?
Creating flashcards might be time-consuming, so sometimes pre-made templates help the process. Here’s how to find flashcard templates in Google Docs:
- Go to Google Docs > Template Gallery.
- Search for “flashcards” in the gallery.
Steps to use and customize a flashcard template:
- Choose a template that suits your needs.
- Click “Use this template.”
- Modify the content and design to match your study material.
Using flashcard templates for study sessions has a lot of benefits. It saves time since you don’t have to format every new set of flashcards. It keeps everything uniform, so you can focus on the content and not worry about the layout. Plus, it’s more efficient because you can quickly add new information without dealing with setup every time.
How to create a custom Google Doc template?
If you have time to invest in making physical flashcards that stand out, use this guide on creating and saving a custom flashcard template:
- Create a flashcard layout as described in the step-by-step guide.
- Format the table to your liking (font, colors, etc.).
- Save your document as a template:
- Go to File > Make a copy.
- Rename it something like “My Flashcard Template”.
- Now, you can use this saved template whenever you need to make new flashcards.

Google Drive flashcards: more features
Exploring Google Docs add-ons that can enhance the creation of flash cards
- Anki Pro integration. Your favorite free flashcard maker Anki Pro supports popular .apkg and .colpkg formats for storing flashcards, which you can find online. To upload a deck in either format, simply select the option when creating a deck.
- Google Slides for more interactive flashcards. Create a new slide deck. Design each slide as a flashcard, with a question on one slide and the answer on the next. Add images, videos, and audio for a rich learning experience.
- Sharing and collaboration. Features in Google Docs make it comfortable to organize a group study. Share your document with study buddies. Collaborate in real-time, adding comments and suggestions to each other’s flashcards. Use version history to track changes and revert to previous versions if needed.
How to make flashcards on Word
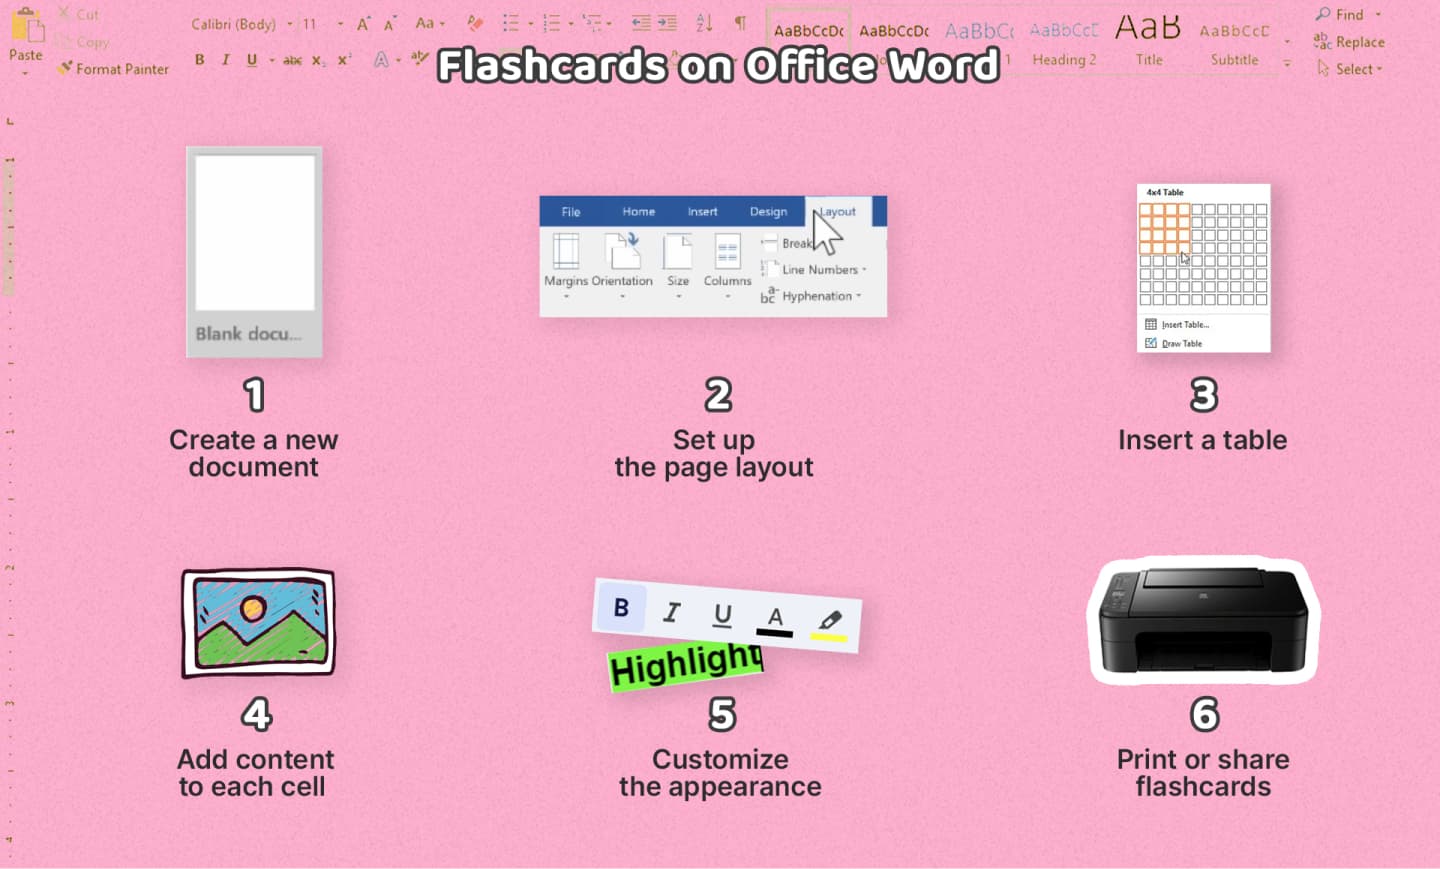
Word and Google doc files are very similar when it comes to their features. Students use both tools, as well as a spreadsheet format, as their flashcard lab. Here’s how to make flashcards using Word:

Step 1: Open Microsoft Word
- Launch Microsoft Word.
- Click on New Document.
Step 2: Set up the page layout
- Go to the menu: Layout > Size to choose your page size.
- Select Orientation and choose Landscape.
Step 3: Insert a table
- Click on Insert > Table.
- Choose your table size (2×1, 4×1, etc.).
Step 4: Add content to each cell
- Type your questions or terms in one column.
- Add text to the answer box/corresponding definitions.
Step 5: Customize the appearance
- Use the Design tab to style your table.
- Change fonts, colors, and add borders as needed.
Step 6: Print flashcards or share
- Go to File > Print to print your flashcards.
- Alternatively, save and share the document via email or cloud services.
How to find Word flashcard templates
If you lack time to properly create flashcards from scratch, you might need some prompts in the form of pre-made templates. It’s helpful to know how to look for them:
- Open Word and go to File > New.
- Search for “flashcard template”.
Steps to use and customize a flashcard template:
- Select a template from the search results.
- Click Create to open the template.
- Edit the content as needed, and add on multimedia elements.

How to create a Word template for flashcards
Here’s a little guide to create and download your own flashcard template:
- Design your flashcard layout using tables.
- Format the table with your preferred fonts, colors, and borders.
- Save the document as a template:
- Go to File > Save As.
- Choose Word Template (*.dotx) and name it “Flashcard Template”.
How to learn flashcards
You can print double-sided pieces of paper with corresponding words and manually flip your flashcards to stimulate active recall. Your ability to memorize information with develop with time as you create more printable flashcards.
Tips to create effective flashcards
- Google “flashcard template Google Docs” and “flashcard template Word” to save time
- Keep information concise and to the point. Write fewer words in your text box = enjoy flash cards that are easier to remember.
- Use images or diagrams when applicable. Visual aids can boost memory retention.
- Ensure readability with clear fonts and contrasting colors. Don’t use Comic Sans. Ever.
- Start using an online flashcard maker to save time.
- Try Google Sheets to create flashcards. It might be more intuitive because of the sheet form.
- Categorize your flashcards by subject or topic for easy access.
- Review your flashcards regularly to reinforce memory (but again, it’s better to let the spaced repetition flashcard app schedule your review sessions).
- Read the article on how to make flashcards that make sense to take the most out of this study tool.

Enjoy studying with flashcards!
Flashcards are an amazing tool for learning, and with Google Docs and Microsoft Word, creating them has never been easier. Whether you’re using a flashcard template Google Docs provides or crafting your own in Word, the process is straightforward and customizable. Follow our steps to design effective flashcards, from setting up your page layout to inserting a table and customizing the border.
Remember, when adding content, keep it concise and use visuals like images to enhance memory. Whether you’re typing out definitions or dragging images into cells, making flashcards can be a breeze. For example, inserting a picture is as easy as dragging it into the document and adjusting it with your cursor. If you make a mistake, don’t worry! You can always press delete or use the undo feature.
In Google Docs, your work is automatically saved, so you never have to worry about losing your progress. Plus, with features like sharing and collaboration, you can work with study groups effectively. If you’re using Word, don’t forget to explore templates, and if you need to develop something unique, the developer tools can be quite handy.
When you’re ready to review, you can press the next slide in Google Slides for an interactive experience. For Word users, organizing your flashcards into a word list can help streamline your study sessions.
We hope this guide has been helpful. Now it’s time to get started on your flashcards and ace those exams. Happy studying!


